Then it will present some things you should know before using the application:
Mostrando entradas con la etiqueta docs. Mostrar todas las entradas
Mostrando entradas con la etiqueta docs. Mostrar todas las entradas
What is SistevProcess?
SistevProcess is an application designed to facilitate the development of other web applications, namely, it is a web application generator. This system makes use of the programming language PHP and Codeigniter framework.
The interesting thing SistevProcess is its ease of use and the ability to build applications for easy maintenance and documentation. To create web applications using SistevProcess you should just drag and drop code components to a workspace.
Each component of user code can be configured to serve a particular function, in some cases require the user to have a minimum knowledge of programming languages PHP, HTML, JavaScript and HTML. However, some of the components have interfaces that allow configuration through a form that is completed according to user needs.
Advantages of using SistevProcess
- SistevProcess offers many advantages in creating web applications, among them are:
- Allows you to create applications easily with drag and drop components to a workspace.
- It is a free tool that can be downloaded and used by anyone who wants it. ( see section " Licensing " )
- It offers an easy way to manage Web applications that can be developed by including more than one person , as it has a visual workspace where application components are arranged in a tree structure and the ability to add comments on each aspect of development , which help much for reading and understanding of the project.
- The working of SistevProcess much fits with other methodologies such as: data flow diagrams , UML ( Unified Modeling Language ) , BPMN ( notation for modeling business processes ) . In this regard , it is possible to adapt to the shape of SistevProcess work of an organization , company, institution , etc.
- Significantly improves communication between departments or Project Management and IT departments . This is because it is possible to visualize and analyze the work done by programmers without being an expert in a particular leguaje and allows programmers to translate the ideas of the project quickly.
- Allows an application prototype that are valuable for project managers or your clients because it allows them to visualize the scope and limitations of the project, even before writing a single line of code.
Note: The application is in the experimental stage, meaning that some functions may not work as desired, therefore it is recommended to use the tool with discretion.
Structure of the code
The coding in SistevProcess is:
Below we detail what the function of each folder:
installer: This folder contains the code to install the system on the web server, for security reasons it is important to delete or overwrite this folder once it is done installing SistevProcess .
resources: This folder holds the images, stylesheets and javascript libraries necessary for the Carrying out of SistevProcess.
server: This folder contains all the functionality of the server side SistevProcess also contains CodeIgniter and MVC structure system format.
temp: This folder is used internally to store temporary files which will then be used for a specific process, for example when projects this folder is used to organize the files will be compressed and then downloaded to the user's computer are packaged.
userdata: This folder contains all the configuration files and components of projects created by the user.
index.php: This is the main php file where stylesheets, javascript libraries and other components required to run SistevProcess pair added.
sp.js: The main javascript file that contains some important system functions.
- installer
- resources
- server
- temp
- userdata
- index.php
- sp.js
Below we detail what the function of each folder:
installer: This folder contains the code to install the system on the web server, for security reasons it is important to delete or overwrite this folder once it is done installing SistevProcess .
resources: This folder holds the images, stylesheets and javascript libraries necessary for the Carrying out of SistevProcess.
server: This folder contains all the functionality of the server side SistevProcess also contains CodeIgniter and MVC structure system format.
temp: This folder is used internally to store temporary files which will then be used for a specific process, for example when projects this folder is used to organize the files will be compressed and then downloaded to the user's computer are packaged.
userdata: This folder contains all the configuration files and components of projects created by the user.
index.php: This is the main php file where stylesheets, javascript libraries and other components required to run SistevProcess pair added.
sp.js: The main javascript file that contains some important system functions.
Discharge
SistevProcess is released under the MIT license . This means that you are free to download, use (including commercial projects ) and modify the application , provided it complies with the conditions stated below.
The MIT License ( MIT) Copyright ( c ) 2014 Sistev
Note: For more information on the MIT license go to this link: MIT Wikipedia
The MIT License ( MIT) Copyright ( c ) 2014 Sistev
Permission is hereby granted, free of charge, to any person obtaining a copy
of this software and associated documentation files (the "Software"), to deal
in the Software without restriction, including without limitation the rights
to use, copy, modify, merge, publish, distribute, sublicense, and/or sell
copies of the Software, and to permit persons to whom the Software is
furnished to do so, subject to the following conditions:

The above copyright notice and this permission notice shall be included in
all copies or substantial portions of the Software.

THE SOFTWARE IS PROVIDED "AS IS", WITHOUT WARRANTY OF ANY KIND, EXPRESS OR
IMPLIED, INCLUDING BUT NOT LIMITED TO THE WARRANTIES OF MERCHANTABILITY,
FITNESS FOR A PARTICULAR PURPOSE AND NONINFRINGEMENT. IN NO EVENT SHALL THE
AUTHORS OR COPYRIGHT HOLDERS BE LIABLE FOR ANY CLAIM, DAMAGES OR OTHER
LIABILITY, WHETHER IN AN ACTION OF CONTRACT, TORT OR OTHERWISE, ARISING FROM,
OUT OF OR IN CONNECTION WITH THE SOFTWARE OR THE USE OR OTHER DEALINGS IN THE
SOFTWARE.
Note: For more information on the MIT license go to this link: MIT Wikipedia
Installation and setup
To install the application you must have the following:
- A web server with PHP 5.3 or greater
- MySQL 5.0 or greater
- A modern web browser (Chrome, Opera, Mozilla, IExplorer 9 +)
- Instructions for installing Apache on Windows
- Instructions for installing Apache on Linux
- Mac OS X comes with apache which can be enabled by checking "System Preferences> Sharing" and ticking the box next to "Web Sharing".
Note: Before performing an installation or system update always remember to backup your old files and database.
Once you download the application proceeds to unzip the file to your web server or on your local machine. You can rename the main folder with the name that you see fit.
Then open your browser to the address that contains the directory SistevProcess, which will take you directly to the system installer, follow the instructions and ready and you can enjoy the system.
Note: Remember to be aware of system upgrades to be conducted continuously to improve the functionality and application security
Create your first project
Now that you installed on your server SistevProcess we will create a simple application to become familiar with the system.
If you open your web browser at the address where the facility SistevProcess first thing you'll see will be a screen like this:

There you click on the "New Project" icon, a window called "New Project Window" appears, standing in the "Project Name" field MyProject. As shown in figure:

Then you click on the "ok" button to create the project.
Once done, we will create a process to do this click on the "Add New Process" button located in the left pane called "Inspector" as shown in the following picture:

When you do this is to display a window called "New Process Window" in the "Enter a name for the new Process" field, put process1 then press "ok" button.
If all goes well you will see in the "Inspector" panel process you just created and in the middle panel (workspace) you will see a tab with the name of the process.
If you want to remove the process workspace only you click on the X "x" that appears at the top of the flange of the process. To open it again, you click on the process name in the "Inspector" panel.
Okay now let's drag a "Code" component is listed first in the right panel called "Components" to our workspace, the figure shows as seen our project so far.
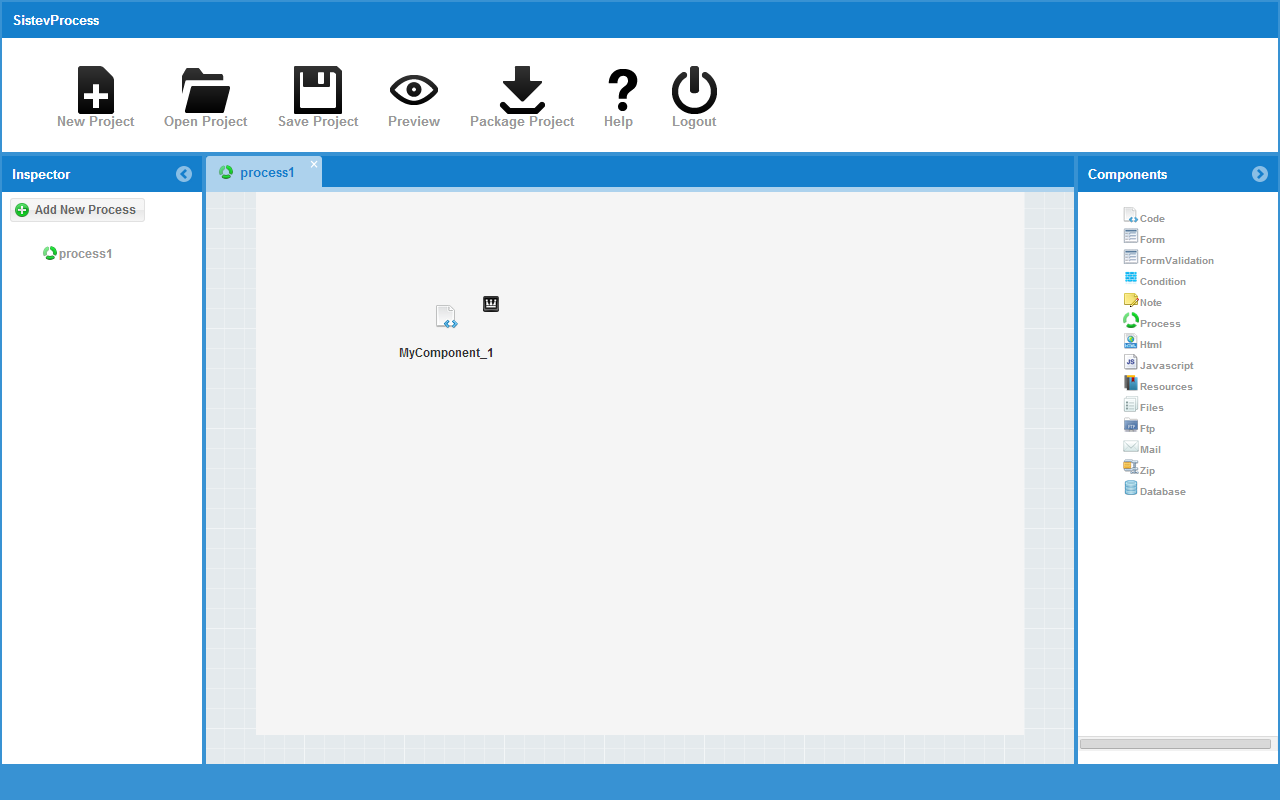
You will notice a kind of crown will appear in the upper right part of the component we just drag, this indicates that the component is "Root", ie is the main component of the process. The Root components are those that are performed first in the processes and also may not have ancestors.
To modify the component must double click on it or right click with the mouse, and in the context menu click on "Edit".
Once done, a window called "Component Configuration Window" appears, there are several elements, the first is a field called "Name Component", a default name for the component which can be modified by a more descriptive name as it appears for example Registration Form, Database Connection, Delete registration, etc.. For purposes of this tutorial we will place Hello World.
The second important element in the window is a central field where you can insert php code Please note that you must enter your php code without the opening and closing tags: <?php...?>
Let's insert the following code:
echo "Hola Mundo";
Then we click on the "Preview" button on the top menu after which a window called "Preview Window" leave the fields empty and click on the "preview" button will appear. If all goes well, we will see a screen like this:

Congratulations, You've created your first application SistevProcess, if you want to keep experimenting with the system can go to the Tutorials section, or continuous with the Basics section to learn more about the tool.
Basics
In this unit we will explore some basic concepts that you should keep in mind to work with SistevProcess. Then this list of the basics:
Application environment
SistevProcess has a friendly and easy to use environment, this section will describe some elements that are part of the application environment and are important for the use of it.

In the top menu operations are fundamental to the system, which are: Create Project, Open Project, Save Project, Preview Process, Packaging Project, Help, and Exit System. Some of these functions will be described in more detail throughout this documentation.

This panel is located on the left side of the system and houses the "Add New Process" button, and the list of processes that have been created in the project.

This panel is located on the right side of the system and is home to a list of all components that can be used to create web applications.

The workspace is the central panel of the application where the project processes open as tabs and is also where you can drop components and organize them according to user needs.
Top Menu
In the top menu operations are fundamental to the system, which are: Create Project, Open Project, Save Project, Preview Process, Packaging Project, Help, and Exit System. Some of these functions will be described in more detail throughout this documentation.
Inspector Panel
This panel is located on the left side of the system and houses the "Add New Process" button, and the list of processes that have been created in the project.
Panel Components
This panel is located on the right side of the system and is home to a list of all components that can be used to create web applications.
Workspace
The workspace is the central panel of the application where the project processes open as tabs and is also where you can drop components and organize them according to user needs.
Projects
The projects represent SistevProcess overview of its implementation. Each project consists of a series of processes, each process has in turn a number of components, the latter being indivisible units of application. In that sense, the projects represent the container for all processes of development.
You can create as many projects as you wish, and fundamental operations on each project are Create, Delete and Pack.
To create a project, click on the "New Project" button on the top menu. When creating a project must be assigned a name, it must be alphanumeric without spaces is the only accepted the underscore symbol (_).
To delete a project click on the "Open Project" button on the top menu, then in the popup window called "Open Project Window" right click on one of the projects listed is made, and the popup menu is clicked " delete ".
The packaging of the project described in the "Package Project" section.
Processes
Processes are independent application modules, they can be executed to perform a specific function. As projects processes are containers, but in this case only contain components.
Although each process is independent from each other, they can communicate with each other through the component "Process" will be discussed later on this topic.
To create a process within your project, you must click on the "Add New Process" button in the Inspector panel. The basic operations you can perform on a process are: Preview, Managing Urls, Rename and Delete. All are accessible by right clicking on the name of the listing process in the Inspector panel.
Components
Components are the smallest units within SistevProcess are indivisible units that have a specific function according to its type. Thus we have for example, a component code that allows you to run PHP scripts, or a zip file compression component, or an html component that generates html blocks. Although each component has a set pree-user can modify their behavior function.
To modify the behavior of a component, we need to double click the component that we dragged to the workspace, there will display a window called "Component Configuration Window" where you can make the desired changes.
In unit 3 called "Components" will explain in more detail each component SistevProcess.
Binding Components
Bind components combining two components to run one after the other, so you can form an execution tree run when the process is invoked that contains them. A component can have only one predecessor and n number of successors a "Root" component may not have ancestors.
To link components, we have at least two components in our workspace, then select the component must be the ancestor, by clicking with the mouse while you press the Shift key on the keyboard, we'll see about this a red border appears , then we click the mouse while you press the shift key on the keyboard in the second component that will succeed the first. If all goes well green arrow connecting the two components shown, the arrow indicates the order in which these components are running. The following image shows how the link will look like two components.

To link components, we have at least two components in our workspace, then select the component must be the ancestor, by clicking with the mouse while you press the Shift key on the keyboard, we'll see about this a red border appears , then we click the mouse while you press the shift key on the keyboard in the second component that will succeed the first. If all goes well green arrow connecting the two components shown, the arrow indicates the order in which these components are running. The following image shows how the link will look like two components.
Preview Process
As processes are created, you can preview your behavior. To do this, click on the "Preview" button on the top menu or by right-clicking the process name in the Inspector panel and selecting the context menu preview. Once done, we will see a window called "Preview Window" in her field with relative url preview and order form with the title "Add Params", with which you can send parameters to the process for evaluating displayed his behavior. The following image shows an example preview passing several parameters.

You can also leave blank the form above and click the "Preview" button.
You can also leave blank the form above and click the "Preview" button.
Managing Process urls
The urls management processes used to modify the way in which you can access each of the processes for execution. To perform this administration should right-click on the name of the listing process in the Inspector panel, and then select the "Manage URLs" option, this opens a window called "Manage URLs Window", the following figure shows the window as seen :

As can be seen in the figure above three fields called: Alias, and Remote CLI. The Alias option is selected by default, however you can choose any other option &oacaute; n hitting the button for each radio. Each option has a specific function:
Alias: Create an alternative name for the process is mainly used to shorten the url and make it more simple. To create an alias just simply choose the alias option in the "Manage URLs Window" and enter a text for the alias eg process1. Then click on the "Add URL" button.
The default URL to which the processes can be invoked in the development environment has the following notation:
Using the Alias option can shorten the url to something like this:
Note: In the above examples the [sistev_process] refers to the directory where your copy of SistevProcess installed on your local server or web server.
Thus if we have a url like the following example:
Using the alias option "Manage URLs Window" window the url example might be as follows:
Note: There may be 2 same alias in the same facility SistevProcess, so for example if you have an alias called "process1" in a project, you can not use that alias in any process of any project.
Remote: With this option you can create a url to run the process from a remote location as another server, or from your laptop or cell phone. To do this you must know the IP address of the device to run the process and add the field called "IP", then you click on the "Add URL" button. This option is useful for creating distributed systems, automatic cascade processes, remote process control, etc.
CLI: With this option you can create a url to run the process from the server console, this is useful to run background processes. To add a url to run the console you just choose the CLI option "Manage URLs Window", and enter a password to give security to the process in May.
As can be seen in the figure above three fields called: Alias, and Remote CLI. The Alias option is selected by default, however you can choose any other option &oacaute; n hitting the button for each radio. Each option has a specific function:
Alias: Create an alternative name for the process is mainly used to shorten the url and make it more simple. To create an alias just simply choose the alias option in the "Manage URLs Window" and enter a text for the alias eg process1. Then click on the "Add URL" button.
The default URL to which the processes can be invoked in the development environment has the following notation:
http://[yourdomain]/[sistev_process]/index.php/execute/preview/[project_ID]/[process_ID]/
Using the Alias option can shorten the url to something like this:
http://[yourdomain]/[sistev_process]/index.php/[alias]/
Note: In the above examples the [sistev_process] refers to the directory where your copy of SistevProcess installed on your local server or web server.
Thus if we have a url like the following example:
http://localhost/My_Project_1223455/index.php/execute/preview/project_1381958569/process_1381958581045/
Using the alias option "Manage URLs Window" window the url example might be as follows:
http://localhost/My_Project_1223455/index.php/process1/
Note: There may be 2 same alias in the same facility SistevProcess, so for example if you have an alias called "process1" in a project, you can not use that alias in any process of any project.
CLI: With this option you can create a url to run the process from the server console, this is useful to run background processes. To add a url to run the console you just choose the CLI option "Manage URLs Window", and enter a password to give security to the process in May.
Note: To run a console process should create a mechanism to call on PHP and the url created, this process varies by operating system using the Server.
Packaging Project
One of the functions SistevProcess offers is the ability to export a project to a different facility SistevProcess your place. Thus, you can create a project on a local server for example, and export this to one or more Web servers.
This option allows you to maintain a level of security to keep the environment of development and production of your project apart. To package a project you must click on the "Package Project" button, this will open a new window of your browser and ask you to give him a path to download a compressed file format. Zip somewhere on your local machine.
After downloading the file to your local machine you can upload to your web server via FTP or your control panel, so you can install on your web server locally or as you wish. Importantly, if your project depends on a database, you must export it manually, because the packaging does not provide (for now) this functionality.
To run the application you just pack you must access the server path through your web browser where you saved the package project, for example: http://localhost/My_Project_1223455/. Doing this page appears a message like this: "App ready to execute ...". To run a specific process you must have created a url according to the "Manage urls Process" section, then use the url created by modifying the path to your installation path packaging project.
For example suppose you have created a type alias url for a given installation process on your SistevProcess, to see this url in the "Manage URLs Windows" window, suppose you have the following form:
So for your packaging project may have the following form:
Enter this new url in your browser and execution of your process should appear.
Note: In the above example the packaging project like installing SistevProcess is on the same local server.
This option allows you to maintain a level of security to keep the environment of development and production of your project apart. To package a project you must click on the "Package Project" button, this will open a new window of your browser and ask you to give him a path to download a compressed file format. Zip somewhere on your local machine.
After downloading the file to your local machine you can upload to your web server via FTP or your control panel, so you can install on your web server locally or as you wish. Importantly, if your project depends on a database, you must export it manually, because the packaging does not provide (for now) this functionality.
To run the application you just pack you must access the server path through your web browser where you saved the package project, for example: http://localhost/My_Project_1223455/. Doing this page appears a message like this: "App ready to execute ...". To run a specific process you must have created a url according to the "Manage urls Process" section, then use the url created by modifying the path to your installation path packaging project.
For example suppose you have created a type alias url for a given installation process on your SistevProcess, to see this url in the "Manage URLs Windows" window, suppose you have the following form:
http://localhost/sistevprocess/server/index.php/process1/
So for your packaging project may have the following form:
http://localhost/My_Project_1223455/index.php/process1/
Enter this new url in your browser and execution of your process should appear.
Note: In the above example the packaging project like installing SistevProcess is on the same local server.
Maximize / minimize workspace
For greater visibility of the workspace is possible to maximize / minimize the same. To maximize workspace, open a process and either an empty spot of the same we do right click, the context menu and select "Maximize / Minimize", as shown in the following figure:

To minimize the work space in an empty spot of the same right click and from the context menu select "Maximize / Minimize", as shown in the following figure:

To minimize the work space in an empty spot of the same right click and from the context menu select "Maximize / Minimize", as shown in the following figure:
Codeigniter
Codeigniter PHP framework is a very light and full documented, which was used for this project and can that knowledge about the use of the framework will be useful (but not required) to build applications SistevProcess. To learn more about Codeigniter visit the following link: codeigniter site .
System Variables
$data_flow: This is an Array type variable that allows you to send parameters from one component to another.
To illustrate its use we will show an example of use. Suppose we have created a process with two components, one a Code type we call "Request" and the second component type HTML will call "Page" component. The following figure shows the components arranged in the workspace:

For the first component (Request) add the following code:
In the code above what is done is to assess the user's request, according to the request, use the variable "$data_flow" to store a value (body_content) to be sent to the next component (Page).
For the next component insert the following code:
Note that the "Page" component is of type html so you can not insert the php code in this sense we use the wildcard {body_content} (Down the use of wildcards is described). You can try this example to familiarize you with the $data_flow variable.
Wildcard: A wildcard is an expression to insert php variables in components not directly execute php code. There are three types of wildcards
$this->CI->executemodel->listComps2Execute: This variable is of type Array and contains a list of all components to be executed in the current process ordered by their location in the execution tree, you can use this variable to change the order of execution of the components, as well as prevent any of them from running.
Note: Improper use of the variable $this->CI- executemodel->listComps2Execute may cause unexpected errors in the execution of the process. Be sure to use the utmost caution possible.
$this->CI->executemodel->allcomponents: This variable is of type Array and contains a list of all components to be executed in the current process in no particular order, some of the components in this list may not be executed in the process because they are not linked to any other component which is not part of execution tree. You can use this variable only for consultation, since its modification should not alter the process execution.
Note: While modifying the variable $this->CI->executemodel->allcomponents should not alter the execution of the process, if it could cause a conflict with the Carrying out of some components. So be sure to use the utmost caution possible.
$this->CI->executemodel->rootComponent: This entry contains the root component of the process.
$this->CI->executemodel->actProject: This entry contains the ID of the project that contains the running process.
$this->CI->executemodel->cssSheets: This variable is of type Array and contains the url of the style sheets to be added to the header of the default output of the process. You can customize this variable.
$this->CI->executemodel->jsLibs: This variable is of type Array and contains the url of the javascripts that were added to the header of the default output of the process. You can customize this variable.
$this->CI->executemodel->jsScripts: This variable is of type Array and contains javascripts that were added to the header of the default output of the process. Note that the system involves the values of this variable between the tags: "<script type="text/javascript"> ... </ script>". You can customize this variable.
$root_folder: Contains the directory path on the implementation of the process. If you modify this variable may conflict other components.
To illustrate its use we will show an example of use. Suppose we have created a process with two components, one a Code type we call "Request" and the second component type HTML will call "Page" component. The following figure shows the components arranged in the workspace:
For the first component (Request) add the following code:
 $section = '';
 $this->CI->executemodel->html_output = FALSE;
 if(isset($_GET['section'])){
      $section = $_GET['section'];
 }
 switch($section){
      case 'home':
           $data_flow['body_content'] = '<h1>This is home page</h1>';
      break;
      case 'services':
           $data_flow['body_content'] = '<h1>This is services page</h1>';
      break;
      default:
           $data_flow['body_content'] = '<h1>404 - Page not found</h1>';
      break;
 }
In the code above what is done is to assess the user's request, according to the request, use the variable "$data_flow" to store a value (body_content) to be sent to the next component (Page).
For the next component insert the following code:
 <!DOCTYPE html>
 <html lang="en">
 <head>
      <title>Test</title>
      <meta http-equiv="Content-Type" content="text/html; charset=UTF-8">
 </head>
 <body>
      {body_content}
 </body>
 </html>
Note that the "Page" component is of type html so you can not insert the php code in this sense we use the wildcard {body_content} (Down the use of wildcards is described). You can try this example to familiarize you with the $data_flow variable.
Wildcard: A wildcard is an expression to insert php variables in components not directly execute php code. There are three types of wildcards
- {wildcard_name}: This wildcard is used to insert values of $data_flow variable as we saw in the previous example.
- {POST::wildcard_name}: insert this wildcard values from the $_POST variable, which is usually used in the form submission.
- {GET::wildcard_name}: insert this wildcard values from the $_GET variable, which is used mainly in the web links.
$this->CI->executemodel->listComps2Execute: This variable is of type Array and contains a list of all components to be executed in the current process ordered by their location in the execution tree, you can use this variable to change the order of execution of the components, as well as prevent any of them from running.
Note: Improper use of the variable $this->CI- executemodel->listComps2Execute may cause unexpected errors in the execution of the process. Be sure to use the utmost caution possible.
$this->CI->executemodel->allcomponents: This variable is of type Array and contains a list of all components to be executed in the current process in no particular order, some of the components in this list may not be executed in the process because they are not linked to any other component which is not part of execution tree. You can use this variable only for consultation, since its modification should not alter the process execution.
Note: While modifying the variable $this->CI->executemodel->allcomponents should not alter the execution of the process, if it could cause a conflict with the Carrying out of some components. So be sure to use the utmost caution possible.
$this->CI->executemodel->rootComponent: This entry contains the root component of the process.
$this->CI->executemodel->actProject: This entry contains the ID of the project that contains the running process.
$this->CI->executemodel->cssSheets: This variable is of type Array and contains the url of the style sheets to be added to the header of the default output of the process. You can customize this variable.
$this->CI->executemodel->jsLibs: This variable is of type Array and contains the url of the javascripts that were added to the header of the default output of the process. You can customize this variable.
$this->CI->executemodel->jsScripts: This variable is of type Array and contains javascripts that were added to the header of the default output of the process. Note that the system involves the values of this variable between the tags: "<script type="text/javascript"> ... </ script>". You can customize this variable.
$root_folder: Contains the directory path on the implementation of the process. If you modify this variable may conflict other components.
Suscribirse a:
Comentarios (Atom)