Note: The code in this tutorial is only for illustrating the use of SistevProcess, so not recommended for use in production applications, as they can have security problems and other vulnerabilities.
First we will create a table called "users", for this we can use the basis of "examples" data created in the tutorial "Connecting to Database". The following SQL contains the structure of the users table:1: CREATE TABLE `examples`.`users` (
2: `id` INT NOT NULL AUTO_INCREMENT ,
3: `name` VARCHAR(45) NOT NULL ,
4: `last_name` VARCHAR(45) NOT NULL ,
5: `email` VARCHAR(45) NOT NULL ,
6: `password` VARCHAR(100) NOT NULL ,
7: PRIMARY KEY (`id`)
8: );
Now let's create a new project in SistevProcess and a process called "register_form". Then drag a component code to the workspace, which we will call "Receive Request", so far so will our process:

Then we added a condition component that we will call "Show Form!". We link the "Receive Request" component with "Show Form?" component to our process now look like this:

Well then we add a form component to the workspace we link to the component "Show Form!" and double click on the form to edit component. As component name put "RegisterForm" in Title Form Stand "Register Form" field, put in submit url "#", and we POST method. Then open the "Fields" tab and add the following fields:
- Name
- Label: Name:
- Name: name
- Type: text
- Value: {POST::name}
Note: In the Value Name field of the wildcard parameter {POST:: name} will serve to re populate the field when the form is used to send.
- Last Name
- Label: Last Name:
- Name: last_name
- Type: text
- Value: {POST::last_name}
- Email
- Label: Email:
- Name: email
- Type: text
- Value: {POST::email}
- Password
- Label: Password:
- Name: password
- Type: password
- Value:
- Confirm Password
- Label: Confirm Password:
- Name: cnf_password
- Type: password
- Value:
- Token
- Label: token
- Name: token
- Type: hidden
- Value: {token}
Note: The token field to be used to give notice to process the user has sent a registration request.
- Submit
- Label: Submit
- Name: submit
- Type: submit
- Value:

Now if pre visualize the project will see something like this:
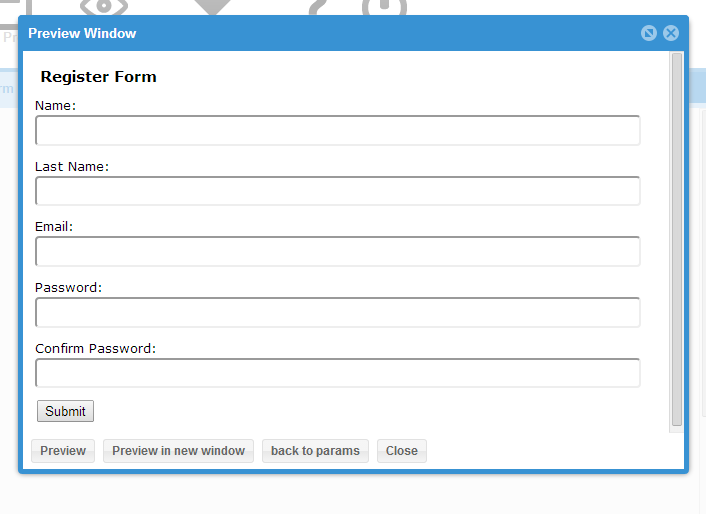
May we have created the registration form, but we must give functionality, if you click right now on the Submit button on the form you just simply create the form disappears, this is because we aim to form the url of the current process. To do so the first step is to create an alias for the process by right clicking on the process name in the Inspector Panel and selecting "Manage URLs" in the window add a url alias type with the name "register_form", you click on Add URL and url should appear as follows:
1: http://[your_sistevprocess_path]/server/index.php/register_form
If you open this url in a new browser window will have the form created. Well now we've created an alias for the process, we will target the form to that alias, for this we open the configuration window component "RegisterForm" and the Form tab again, change URL Submit the alias we just created, we keep the previsualizamos changes and the process again, if we did well all by clicking on the Submit Form button "Register Form", it no longer disappears but reappears, even if we complete some fields these are not cleared but retain content (except for password and cnf_password that are not added the wildcard value).
Well we will now change the "Receive Request" component, in which we will insert the following code:
1:  $data_flow['validation'] = FALSE;
2:  $data_flow['show_form'] = TRUE;
3:  $data_flow['form_errors'] = '';
4:  $data_flow['token'] = time();
In previous code block declare the variable "$data_flow ['validation']", this variable indicates whether the validation of user-supplied data is correct or not, we assign the default false value. Then there is the variable "$data_flow ['show_form']", which indicates whether to show no registration form or by default if we say that we should show by assigning the value True. Then we have the variable "$data_flow ['form_errors']", which will serve to show the errors that make the user in the form. Finally we have the variable "$data_flow['token']" indicating whether the user is performing a registration request from the form. We continue to add more code to our component:
1:  $data_flow['validation'] = FALSE;
2:  $data_flow['show_form'] = TRUE;
3:  $data_flow['form_errors'] = '';
4:  $data_flow['token'] = time();
5:
6:  if(isset($_POST['name']) && !$_POST['name']){
7:       $data_flow['form_errors'] .= '<p>Name field is required</p>';
8:  }
On line # 6 verifies that this field name and getting this is not empty, otherwise an error is sent to the user. Continue typing:
1:  $data_flow['validation'] = FALSE;
2:  $data_flow['show_form'] = TRUE;
3:  $data_flow['form_errors'] = '';
4:  $data_flow['token'] = time();
5:
6:  if(isset($_POST['name']) && !$_POST['name']){
7:       $data_flow['form_errors'] .= '<p>Name field is required</p>';
8:  }
9:  if(isset($_POST['last_name']) && !$_POST['last_name']){
10:       $data_flow['form_errors'] .= '<p>Last Name field is required</p>';
11:  }
12:  if(isset($_POST['email']) && !$_POST['email']){
13:       $data_flow['form_errors'] .= '<p>Email field is required</p>';
14:  }
15:  if(isset($_POST['password']) && !$_POST['password']){
16:       $data_flow['form_errors'] .= '<p>Password field is required</p>';
17:  }
18:  if(isset($_POST['cnf_password']) && !$_POST['cnf_password']){
19:       $data_flow['form_errors'] .= '<p>Confirm Password field is required</p>';
20:  }
From the line number 9 through 18 do the same test we did with this time name the field the rest of the fields. Continue typing:
1:  $data_flow['validation'] = FALSE;
2:  $data_flow['show_form'] = TRUE;
3:  $data_flow['form_errors'] = '';
4:  $data_flow['token'] = time();
5:
6:  if(isset($_POST['name']) && !$_POST['name']){
7:       $data_flow['form_errors'] .= '<p>Name field is required</p>';
8:  }
9:  if(isset($_POST['last_name']) && !$_POST['last_name']){
10:       $data_flow['form_errors'] .= '<p>Last Name field is required</p>';
11:  }
12:  if(isset($_POST['email']) && !$_POST['email']){
13:       $data_flow['form_errors'] .= '<p>Email field is required</p>';
14:  }
15:  if(isset($_POST['password']) && !$_POST['password']){
16:       $data_flow['form_errors'] .= '<p>Password field is required</p>';
17:  }
18:  if(isset($_POST['cnf_password']) && !$_POST['cnf_password']){
19:       $data_flow['form_errors'] .= '<p>Confirm Password field is required</p>';
20:  }
21:
22:  if(isset($_POST['email']) && !filter_var($_POST['email'], FILTER_VALIDATE_EMAIL)){
23:       $data_flow['form_errors'] .= '<p>Email is invalid</p>';
24:  }
25:  if(isset($_POST['password']) && strlen($_POST['password'])<5){
26:       $data_flow['form_errors'] .= '<p>The password must be 5 characters minimum</p>';
27:  }
28:  if(isset($_POST['cnf_password']) && isset($_POST['password']) && $_POST['password']!==$_POST['cnf_password']){
29:       $data_flow['form_errors'] .= '<p>Passwords do not match</p>';
30:  }
On line # 22 we verify that the email is valid. On line # 25 we verify that the password is at least 5 characters. On line # 28 we verified that both passwords match. Continue typing:
1:  $data_flow['validation'] = FALSE;
2:  $data_flow['show_form'] = TRUE;
3:  $data_flow['form_errors'] = '';
4:  $data_flow['token'] = time();
5:
6:  if(isset($_POST['name']) && !$_POST['name']){
7:       $data_flow['form_errors'] .= '<p>Name field is required</p>';
8:  }
9:  if(isset($_POST['last_name']) && !$_POST['last_name']){
10:       $data_flow['form_errors'] .= '<p>Last Name field is required</p>';
11:  }
12:  if(isset($_POST['email']) && !$_POST['email']){
13:       $data_flow['form_errors'] .= '<p>Email field is required</p>';
14:  }
15:  if(isset($_POST['password']) && !$_POST['password']){
16:       $data_flow['form_errors'] .= '<p>Password field is required</p>';
17:  }
18:  if(isset($_POST['cnf_password']) && !$_POST['cnf_password']){
19:       $data_flow['form_errors'] .= '<p>Confirm Password field is required</p>';
20:  }
21:
22:  if(isset($_POST['email']) && !filter_var($_POST['email'], FILTER_VALIDATE_EMAIL)){
23:       $data_flow['form_errors'] .= '<p>Email is invalid</p>';
24:  }
25:  if(isset($_POST['password']) && strlen($_POST['password'])<5){
26:       $data_flow['form_errors'] .= '<p>The password must be 5 characters minimum</p>';
27:  }
28:  if(isset($_POST['cnf_password']) && isset($_POST['password']) && $_POST['password']!==$_POST['cnf_password']){
29:       $data_flow['form_errors'] .= '<p>Passwords do not match</p>';
30:  }
31:
32:  if($data_flow['form_errors']==='' && isset($_POST['token'])){
33:       $data_flow['validation'] = TRUE;
34:       $data_flow['show_form'] = FALSE;
35:  }
On line # 32 we check if there are no errors and sent the token means that the information provided by the user is correct for this reason we assign the validation variable as TRUE and FALSE Show_Form. After that save the changes of the component "Receive Request".
Now let's modify the "Show Form?" Component. To do this open the Settings window and we modify the same code with the following:
1:  return (isset($data_flow['show_form']) &&
2:            $data_flow['show_form']);
In the above code we verified that the variable "$data_flow ['show_form']" is true to display the form. Save the changes in the component. Now you can preview the process and see if they make mistakes when entering data on the form are shown on the top. If you complete all fields correctly and press the Submit form disappears. Let us now record the information provided by the user in the users table we created earlier in this tutorial.
We are going to drag a component Condition workspace and call it "Correct Form?" Then we link the component "Receive Request". Now let's drag a Database component to the workspace and we link to the "Correct Form?" Component, now let's change the Database component by double clicking on it.
In the component name we'll call "Register User BD", then enter the data of your MySQL Server host, username, password, database put on "examples" and add the following SQL:
1:  INSERT INTO `examples`.`users` (`name`,`last_name`,`email`,`password`) VALUES
2:  ('{POST::name}','{POST::last_name}','{POST::email}',sha1('{POST::password}'));
Note that the password is stored encrypted with sha1() function MySQL. Finally save the changes. So far the process should look like this:

Now if previewing the process and you enter data in the correct form should save user information in the users table. To verify you can use PhpMyAdmin or MySQL Workbench. However, the form continues to disappear and the page is blank, so we will add a page of success at the end. To do this you drag a component to Html workspace and link it to the component "Register User BD" then modify it to place him the name "Success Page" and the following code:
1: <h1>Success!</h1>
Previews again and see how your project a success page is displayed when you enter the data correctly.
The final process should look like this:

Congratulations! You've created a registration form with SistevProcess.
No hay comentarios:
Publicar un comentario